Tuesday, February 25, 2014

Living Room turned Dining Room

As I am sure many of you are aware, when it comes to remodeling, it's like opening a can of worms.  One things leads to another, in order to do this, first you have to do this and that and once this is done, then you have to do that.  Oh, and since we did that, we might as well do this too.....

Sometimes, it's exhausting.

But I can honestly tell you that I have never said afterwards that it wasn't worth it.

Enough babbling.  Let's look at some pictures.

This is from when we pretended to be from Europe and moved everything into one room.
 Just kidding.  Obviously this is during the kitchen remodel and we had to move everything into our living room.  That was a month-long endeavor in which I don't care to repeat.  Meals were prepared by microwave in the basement or by our close friends at Pizza Hut.
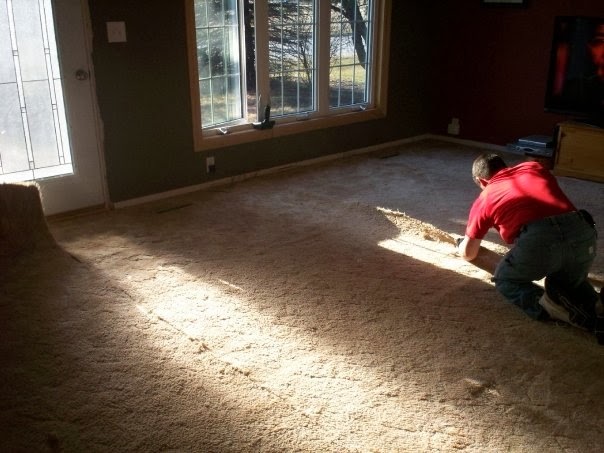
So this was our living room at the time (2007) which is now our present day dining room/room with a big table that is covered with homework, coloring books, crayons, boogers and crusty who-knows-what.
 

I could not get rid of this carpet fast enough!  Years of smokers in the house and wood stove soot had taken it's toll.  It was time to go! (Note my mentioning of the wood stove.  A fun fact post to come in the future :] )


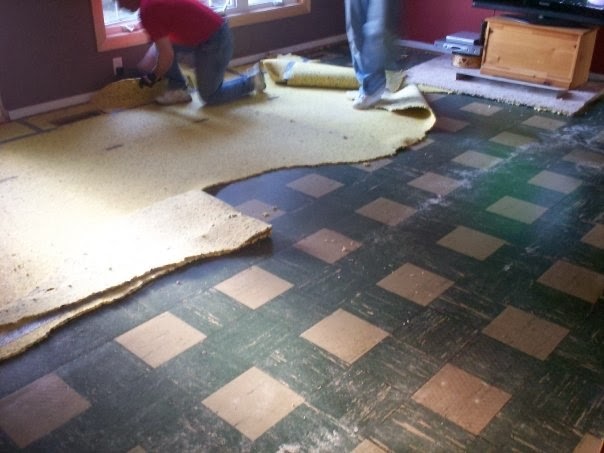
And away we go!  Or they go, I should really say.  And when I say "they", who I mean are Ryan and Dustin.  Now would be a good time to introduce you to Dustin since you're checking out his tush.  Dustin is a childhood friend of Ryan and I and has been a major contributor to The House.  He works for food and beer.  Everyone should have a Dustin.


Buh-bye yucky carpet.


Hello tile from 1954


I don't know if it's just me but I actually think this tile is kinda cool.  But I will admit that I was pretty bummed that we didn't have hardwood flooring hiding under the carpet.  That was the common flooring for homes of that era.  But not ours.  Darn it anyways.


Removing the tile was pretty easy.  We used a straight-edged hoe and it came right up. 


For once something was actually easy!


Break time!  Definitely earned.  Those little blue and silver cans you see them holding are a must have when doing any sort of remodeling.


And now the after photos........

This is the same flooring we put in the kitchen: Hickory.  Hickory is one of my most favorite wood types.  I love the randomness of it.  And more importantly, it hides dirt really good.


We bought this flooring at one of the big box stores in town.  It was completely pre-finished.  All we had to do was install it.  My uncle owned a flooring nailer we were able to borrow but if you ever do this, you can always just rent one from the local hardware store. 

 Oh hi, Jace.  Those are ugly pajamas you have on.
 

The french doors you see here are what lead to what is now our current day living room.  It was originally the one-stall garage, then converted into a living room in the 1970's.  Then in 2004 it was a sealed up mess for a few years before we dove in.  That will be a post for a later date and I will venture to say that it will be the crown jewel of this entire blog.... That one was a doozy.


My floors are really dirty in these pictures. See?!?! I told you this Hickory is awesome for slackin' floor cleaners like me!


This is one more item we sort of missed the boat on... This step would have made a great hidden storage area for things like blankets, dog toys, apple cores or half-eaten peanut butter sandwiches. Oh well. Next time.

One more project down, a few more to go!


Saturday, February 22, 2014

Al Capone's Vault

I'm kind of irritated with myself that I didn't see these photos before I posted the first Basement post.  I have a feeling that may happen with many of my posts so I'm so relieved I stuck the disclaimer in the begining of my blog stating that these won't be in order or very organized. I should probably add to it that this blog will be severely random, go off on tangents and sometimes make me seem like I am losing it.  Well I guess I'm going to prove it more than I thought!


Look what I found!


So this is what we had to start with.  When we moved into our house, this little square hole had already been done.  Grandma actually would climb in and out of here to store her canned goods.  Crazy Grandma.
It also had killer acoustics.  When it was completely empty, I would go in there and sing and Celine Dion had nothin' on me.  But Husband wouldn't let me keep my little Sun Records Studio for some reason so I'll have to save that dream for another day.  


Doesn't this look like fun?  Super hubby is using a a jackhammer that we rented from the hardware store.  This is after we tried using the diamond blade saw with the broken water fitting for the hose.  This photo reminds me of Al Capone's Vault.  Geraldo is hiding just around the corner... See his shadow?  You can totally tell it's him by the huge head.

Done.  Boom.

We plan on putting a door on this so it doesn't look so creepy.  We're thinking a barn-doorish door on a track system..... Whatdya think?


Peek-a-boo!  You're not that sneaky, honey... ;)


Thursday, February 20, 2014

Basement Update # 1

So I'm still figuring out how this blog works and I have no idea if I edit earlier posts and add photos to it if it'll become the most current post.... Will it?  I have no idea.  I don't think so.  So, I don't want anyone to miss out on new photos I post, because, obviously, that's the purpose of this BLOG.  So, I made the executive decision just now to create a new post every time I add new photos.  So this post is entitled Basement Update # 1.  And I'm just going to take a stab in the dark here and guess that it's going to be update # 1 of about 537... or infinity.  Because like I always say, in my world, there is no finish line.

Here goes.. If you need a refresher of the previous photos, click here

TILE'S IN DA HOUSE!  WOOOO!!!!
 So this is my newly tiled floor.  This is actually ceramic tile that looks like hardwood flooring. 
Cool, huh?  I love it.  I love it even though it's super dooper dirty because
it's covered with sheet rock dust and sawdust. 
But someday, it will be clean and I will dedicate an entire post to clean floors. 
Someday.  Maybe.


We now have wood on the walls!  WOOD IS IN DA HOUSE!  WOOOOOO!
We went with white pine 1" x 8" planks.  We're not going to stain them, just polyurethane them.  I like their natural light color and with it being a small, narrow basement, lighter colors are better to make it feel open.


We did want some contrast however so we decided to stain the shelving units of the future entertainment center the famous Dark Walnut color as you can see here.... I ran out of stain on the right one because some dumbass spilled an entire can of it.


Another project made by super hubby. He built these shelving units all by himself. They have doors that go on the bottom part. This unit, once the doors are on, will hide the sump pump but still give us access to it... So clever. I told you he's good!!


See the doors? See the fireplace? It's hiding behind the TV from 1985 that has the disco ball on top of it. Late at night, when Ryan's done working he turns it on and cranks up Gloria Gaynor and goes to town. It's how he destresses...everyone needs an outlet. Don't judge. It's a sight all should see.


These are my little helpers... They helped make a mess in the basement.
 And the rest of the house.


I'll end this blog with a little teaser of a project in the basement we're going to start tonight......
It has to do with this little area riiiiggghhhht here...
Here's a hint:  Abe Lincoln


Fun Fact # 1

I promised you early on that throughout my blogging journey, I would reveal fun little tidbits and some history of our house.

So a hundred years ago when I was a college kid, Grandma and Grandpa would travel a lot and go on month-long trips to Alaska, Colorado and who knows where else.  And guess who they would have house sit? 

And guess who would house sit and promise not to have parties but would have 'small gatherings' in lieu of parties?

WRONG!  It was me!!

Hey - they told me I could have a few friends over, so there!

Anyways, I would have these small gatherings and one time, this super hot guy came to one of them and we ended up ALONE in the kitchen together....  And, Oh-Em-Gee, we kissed! 

Right here:


Oh, and guess who the super hot guy was?!?!?!?!

Yeppers, Ryan aka super hubby.  Yes, ladies and ladies (for some reason I highly doubt any gentlemen read this blog but if I'm wrong - please feel free to correct me because I love being corrected.  It's my favorite.  I digress.  Jeez, did I mention I have a short attention span?  I seriously wonder if I don't have some condition because I go off on tangents.  A lot.  Like now.... is this where I put my second parenthesis thingy? )

Yes, PEOPLE, Ryan and Milissa had there very first kiss in their future kitchen.  Circa... I have no idea.

Wednesday, February 19, 2014

Now you see it, now you don't. But you will again. Eventually.

Circa 1954 
 
 
So besides the above photo from 1954, these are the earliest photos I own from when we moved into our house..... 
 Yeah.... So there is a story here.  And it does involve a contest and some alcohol. 
And the hubby being absent.
The bad news:  We didn't win the contest.
 
The good news:  The fresh paint covered up the graffiti
 Whew!
 
Circa 2007
 New siding and windows


And here we are today:  Garage-less.  But with snow.


Well, not completely garage-less
 
 
The Plan
 
 
Stay tuned!!
 

The Wall

This is my wall.
I love my wall.
And this is my blog so I can brag about my wall.  And how much I love it.

Meet, Wall.
 
Being a creatively challenged individual, the fact that I did this all by myself and it actually turned out is a minor miracle.  Thus, the bragging :)
 
This would probably be a good time for a confession.  I am addicted to Pinterest.  If Pinterest were a person, I would call and talk to her (Pinterest would totally be a girl) every day and probably say I love you.
 
I found this on Pinterest, followed the directions and low and behold, The Wall.
 
Ingredients for The Wall:
  1. Brown paper-sack paper that you can buy on a ream at any home improvement store
  2. Elmers glue
  3. Water
  4. Wood Stain
  5. Polyurethane (I have to Google that damn word everytime on how to spell it!)
  6. Bucket
  7. Chip brush
  8. Staining mit
  9. Beer
Directions:
Rip up the paper into random pieces, keep the straight edged pieces in a separate pile for your edging of The Wall.  Crinkle them up and throw them in a bucket of Elmers glue and water of about a 6:2 water to glue ratio.  Leave 'em in there for about a minute and then just start slapping them on the wall in random fashion like a first grader arts & crafts project.  Make sure your edges overlap a bit.  Let it dry overnight and then apply the stain.  Use any color you want.  I used Dark Walnut.  Whatever you do though - and this is so important - do not trip and lose the can of stain and have it explode all over the basement floor and yourself like this:
That sucked.
 
That's where the beer comes into the equation.  And if you don't spill, that's where the beer comes into the equation because that is your reward for your awesome Wall.
 
Once your stain is dry, slap a couple of coats of poly on there and call 'er good.